Extracto, extraído de las entrañas de Internet.
--------------------------------------------------------------
Llevaba tiempo queriendo hacer esta entrada, y antes de empezar la Universidad sobretodo. Así que aquí estoy!
La verdad es que este verano me he dedicado, entre otras cosas, a hacer camisetas. Las camisetas que había hecho hasta ahora eran de grupos de música rock. Pondría alguna imagen de ejemplo pero no tengo ahora mismo ninguna. El caso es....llevaba queriendo hacer una camiseta al estilo ''hippie'' bastante , y siguiendo algunos tutoriales lo he conseguido (más o menos).
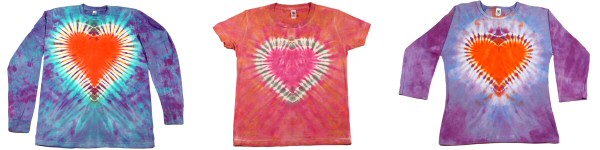
LO PRIMERO que hay que hacer a la hora de pintar una camiseta es elegir el tipo de camiseta que queremos. Yo he hecho de todo tipo: de tirantes, de manga corta, anchas, estrechas y de efecto falda. Una vez tengamos el modelo, hay que elegir qué tipo de dibujo o forma queremos dibujar en nuestra camiseta. Para ello me informé en google antes y encontré varios, pero elegí el típico de espiral y uno en forma de corazón.
LO SEGUNDO es mojar con un spray la camiseta que hayamos elegido y doblarla por la mitad :

MÁS...
LO TERCERO es dibujar un medio corazón en la parte que dobla la camiseta, es decir, en el eje central de ésta. Lo podemos dibujar con rotulador permanente o con uno especial para pintar sobre tela :


LO CUARTO (y ahora viene la parte difícil) es doblar la camiseta al rededor de la línea de dibujo,es decir, el corazón. A mi me costó bastante y pensé que no quedaría bien, pero tranquilos que sí.


LO QUINTO es enrollar el resto de la camiseta y dividirla en secciones. Podemos utilizar gomas elásticas , de forma que quede así :

Y por último, y como veis en la imágen ,pintar cada sección de un color diferente .
Yo he utilizado tinta para teñir camisetas. Debéis de mezclar los polvos de color con agua hirviendo y sobretodo hacerlo en un lugar dónde podáis limpiaros rápidamente ya que pringa mucho. Yo utilicé guantes y aún así me pringué.
El resto...pues esperar a que pasen 5 días para que se seque bien y dejar la camiseta dentro de una bolsa de plástico.
El resultado fue éste:


"1. Lay your prewashed blank apparel or fabric flat on a table.
"2. Wet the fabric until it is uniformly damp (spray bottle), but not dripping. Then, fold the fabric in half- down the middle of the fabric (as shown above). This step is similar to a heart cutout on paper.
"3. Create a heart template on cardboard/posterboard or draw a freehand half-heart. Use a fabric marker or heat-transfer pencil to temporarily markup the fabric.
"4. Accordion fold the fabric along the drawn heart-shape line, forcing it into a straight line.
"Note: Often hearts are made by stitching the shape and resist dyeing, the heart shape is created by the undyed, resisted areas. These illustrations detail how to fold a heart and the technique will also transfer to many other popular shapes.
"5. Once the arc of the curve is forced into a straight line, the fold becomes a straight accordion fold.
"6. Your accordion folded line should now reflect a small straight line (shown directly above).
"7. View the small portion above. Dye placed in the small area will create the dyed shape of the heart.
"8. Use cotton string to tie along the drawn line. To create a color ring (band) around the heart, tie an additional parallel band. (optional)
"To dye the heart, place a dye color in the smaller area next to the tied cotton string (or rubberband) and use your hands to squeeze/blend a solid color w/ little or no white areas. The heart looks great with or without a color band (parallel line of color placed on the outside of the heart line) to define the shape.
"The outside fabric color (bleed area) also defines the heart shape and you will also get a resist from the tied string that creates an outline of the heart. For further details on applying dye colors, view Michael Fowler's Art of Tie-Dye DVD. "